HOW TO SET UP A SECURE GUEST Wi-Fi NETWORK: Step-by-Step Guide for Home and Small Business
Introduction
 |
| Setting up a Guest Wi-Fi network |
Step-by-Step Instructions
Step 1: Access Your Router’s Settings
Log in with your router’s admin credentials
To start, you’ll need to access your router’s settings. Open your web browser and type in the router’s IP address (usually something like 192.168.1.1). Log in with your router’s admin credentials.
Step 2: Enable the Guest Network
Give it a unique name (SSID)
In the router settings, look for the Guest Network option. This might be found under a section like “Wireless” or “Wi-Fi Settings.” Enable the guest network and give it a unique name (SSID) that distinguishes it from your main network.Step 3: Set a Strong Password
Use WPA3 encryption or WPA2
While the goal is to provide internet access to guests, you still need to secure the guest network. Set a strong password using WPA3 encryption (or WPA2 if WPA3 isn’t available on your router). Avoid using easy-to-guess passwords and encourage your guests to do the same.
 |
Use WPA3 encryption or WPA2 |
Step 4: Enable Network Isolation
Prevent guests from accessing devices on your main network
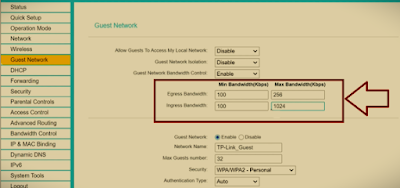
To further secure your Guest Network, enable network isolation. This prevents guests from accessing devices on your main network, such as printers or shared files, and ensures they only have access to the internet.Step 5: Limit Bandwidth for Guests
Cap the bandwidth for the guest Wi-Fi
If you don’t want your guest network to slow down your internet speed, you can limit the bandwidth. Some routers have built-in features that allow you to cap the bandwidth for the guest Wi-Fi, ensuring your main network remains fast.
 |
Limit Bandwidth for Guests |


Comments
Post a Comment